Sunday 30 December 2012

::Crochet:: Starry Coasters

In my last post I showed some coasters that I gave to my sister. Here is the story of how they came to be.

I'm a member of a group called CWA. Now we're not a part of the Country Women's Association, but we are a Crafty Wonders Alliance (I just made that up). :)
The point of the group is that we get together and teach each other about our mad skillz. So an example of this is my friend Sarah of Stitching Lyrical did a session on crochet (she is a wizz with a hook and a ball of yarn) and a session on jam making (it was simpler to make than I thought.).

Anyway, anyway, anyway. I was due to have a session at my house in October and I decided that we would do crochet. I was going to do knitting, but I thought that it would be better to do crochet everyone seemed to enjoy the crochet session Sarah had and I thought it would be nice to continue with it. I pondered about what we could make for some time, I did some searching on Ravelry and then a plan starting forming in my brain. Veeerrryyy ssslllooowwwlllyyy. I found this pattern and then I found this tutorial.
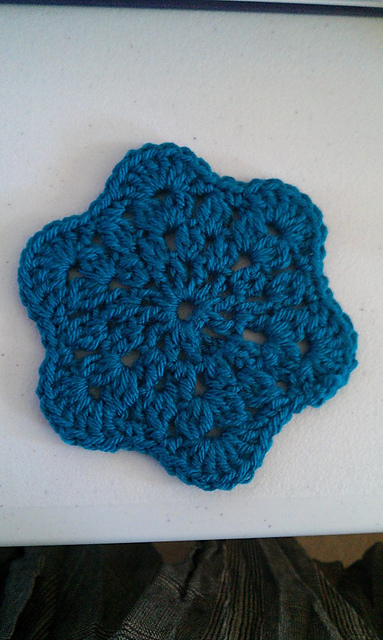
I made this tester and I new this was going to be the pattern to use.


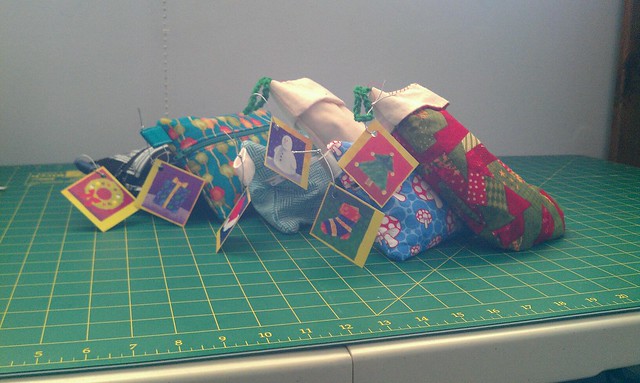
These star shaped coasters would make great Christmas presents. A great idea that Sarah came up with was to put them in watered down glue gently squeeze out the excess and then hang them on the Christmas tree as decorations. I guess you could do this with all sorts of crochet/knit items. The mind boggles at the possibilities. :)

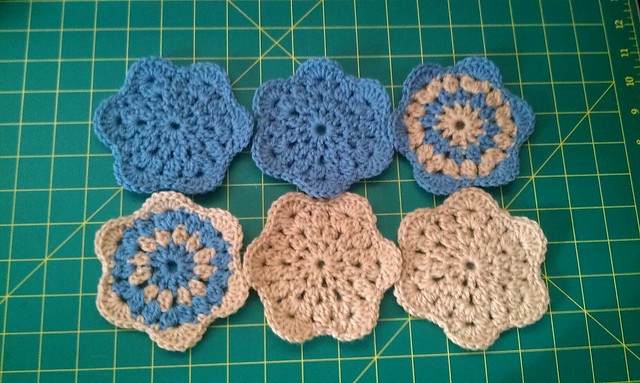
I was telling my sister about me crochet coasters and I showed her one that I'd made. She requested some and I hauled out my yarn stash for her to select some yarn.

I made all 6 of her coasters in one evening. That's right. I am a machine. Check it!
So that is the story of how I made my sister some Starry Coasters for Christmas.

The End.

Until next time, I hope your making things to put drinks on too,
Vanessa xo

::Sewing:: Christmas 2012 Giftings

Hey there!

I hope you had a great Christmas. This year I made most of my/our gifts. I did it because I am not a big fan of shopping and I'm even less of a fan of the crazy pre-Christmas shopping frenzy.

Using the free Craftsy course Bag-Making Basics: Reversible Tote & Zipper Pouchwith Kristin Link I made my sister, MIL and SILs a zipper pouch each.

Here are my fabrics all cut out and ready to go.
Christmas 2012 Giftings - Zipper Pouches - raw materials
Exterior, lining and zippers all ready to go!

When I use interfacing I like to cut it slightly larger than intended to make a cleaner finish once I've trimmed it down. So an improvement on the process for future would be to cut out all the external pieces as one block of fabric. Fuse the interfacing and then cut the separate external pieces to size. This would mean that I could avoid this mess of interfacing scraps after trimming it down all the individual external pieces after fusing the interfacing to it.
Christmas 2012 Giftings - Zipper Pouches - Interfacing Scraps
All my interfacing scraps. And this wasn't even all of it!

Making four pouches at the one time meant that I was able to do some chain sewing.
Chain sewing pouch tabs top-stitching.

Here are the finished pouches. The tabs are made of the same fabric in the lining.
Christmas 2012 Giftings - Zipper Pouches
Clockwise from top left: my sisters; MIL; younger SIL; older SIL
The mushroom one went to my sister who picked out the fabric on a trip to the fabric store a few days before. The white and teal one went to my MIL; black one with doors and keys went to my younger SIL and the teal one went to my older SIL. For more pouch pictures check out my flickr.

For pouch fillers I gave my MIL and SILs a travel size bottle of The Body Shop body wash and either a loofah, face chamoise or shower cap. Here are the crocheted coasters I made for my sister and popped in her pouch. Ravelled here.
Crochet Coasters
Six crocheted coasters for my sis

I gave my sister's BF and Mr S's nephew a Christmas stocking each. The plain calico one went to Mr D (my sister's BF) and the other other one went to LP (the Mr's nephew). Mr D got a gift card (the thingy sticking out in the picture) and I filled both of the stockings with lollies and baste stitched the tops closed for ease of transport.
Christmas 2012 Giftings - Mini Stockings
Mini Christmas Stockings FTW!
After I took the picture I added a crochet chain loop to each of them so they could be hung for next year.

Here are all my pressies ready with gift tags ready for gifting.

Christmas 2012 Giftings - Gifts Ready!
Gifts made? Check! Gifts tagged? Check! Alright, let Christmas commence!

I have a couple more gifts to give, but as they haven't yet been delivered to the recipients I best not disclose their details just yet.

Until next time, hope you making lovely things for the ones you love (especially yourself),
Vanessa xo

Monday 10 December 2012

::Sewing:: Sturdy Striped Tote


The Mr's nephew is turning three last weekend and I gave him something that I've been working on for longer than he has been alive. If you follow me on Instagram (I'm @simplefibrelife) you'd have seen glimpses of it.


I gave him a rainbow granny square throw. I was thinking about how I was going to wrap his present. Then I remembered the Reversible Tote Course on Craftsy. I thought it would be a neat idea to give him his gift in another gift.

So on Friday evening I made a tote following the instructions from the free
Bag-Making Basics: Reversible Tote and Zipper Pouch Craftsy course.


Well, I did make a few changes. Seeing as I was just using what I had on hand I had to cut the the external pieces to different lengths, but I made sure (at least I thought I had) to match the 16 x 17.5 inches of the lining piece. As I was only working with fat quarters I cut the external pieces as 16 x 9.5 inches and 16 x 8.5 inches; I forgot the 1/2 inch seam when sewing the two pieces together. Making the final piece 16 inches. DOH! Oh well it wasn't too much of a bummer.

I also fused some iron-on interfacing to the exterior of the tote after I had sewn the seam for each of the exterior panels, but before I joined them. When I joined them I sewed up both sides, attached the straps, then I sewed the bottom. Speaking of the straps, I'm a perfectionist so I used my adjustable edger foot to do the top-stitching along the long edges of the handles.

When I sewed the lining together I left a whole at the bottom to turn the bag out the right way; that way I wouldn't need to leave a gap when I sewed the lining to the exterior. When I boxed the corners of the lining and exterior I made the base of the bag 5 inches wide as I really wanted a sturdy bottom on the bag. I also omitted the pocket.

I made something from a Craftsy course! Yay! It makes me feel a little better after my last post. Are you crafting gifts this season? If so, what are you making? Leave me a comment :)

Until next time, I hope you're improvising on your projects ;)
Vanessa xoxo

Monday 3 December 2012

::Show & Tell:: I have an addiction...

Yep, it's out there. I'm a Craftsy addict. I have 16 classes. Sixteen!
Although I have to admit some of them are free classes.

[source]


These are the ones I've bought


Ahem, I may or may not have gone a little crazy when Craftsy had a recent sale. Most of their classes were about 20 bucks and I bought 4 classes in one go. Ahem  :)


The free ones I've added to my account are:

A couple of these free classes are a bit left-of-centre for me. I'm not not that interested in cake decorating, but the Modern Buttercream course was on of the initial promotional free classes. I liked what I saw so I scoped out the rest of Craftsy for other courses. I just thought I'd have look at Microtorch basics to get an understanding of what is involved in jewellery making.

Other classes hit the mark. I'd started knitting the Purl Bee Bandana Cowl and thrown it aside when I realised I'd have to do short rows - which I don't know how to do and couldn't understand the instructions. Luckily for me the Short Rows class was free.

Some of the instructors on these courses are really great at grabbing your attention, some aren't so much. But that is super subjective. Regardless of the instructors I always really like the content of each course. I've been enjoying watching these courses, but watching Craftsy is a major suck on my monthly internet data plan.

How many courses have I watched all the way through? Shhh, Only one Bag-Making Basics: Drawstring Bag & Bucket Bag. And it was one of the free ones!!!
How many things I have I made you ask? Zip, nadda, nothing. I haven't even put my new short-rowing skillz to good  use on that bandana cowl pattern. Although I'm hoping to rectify that in the near future - especially when making presents for the festive season.
Even though I haven't seen all the classes all the way through, I'm learning heaps of great tips and really enjoying it. So, I'm crushing pretty hard on Craftsy at the moment.

If you're interested to see what Craftsy is like I totally recommend that you try out the free classes they have online. I'd also recommend that you turn off the HD whenever you're watching the videos.

FYI I'm totally not getting kickbacks or freebies from Craftsy.

Until next time, I hope you're learning something new,
Vanessa xo

Thursday 29 November 2012

::Show and Tell:: Weekend Shopping


Last weekend Spotlight had a 'spend $100 or more and get $40 off' deal. There were a couple of things I wanted to buy and a couple of fabrics in the catalogue that I was keen to have a look at.
My sister, mum and I traipsed off to the shops on Sunday morning.

I came away with these goodies. (The photos are a bit washed out, but that's what you get when you use your phone camera :) )


I bought this blue with spots cotton lawn


Some royal blue cotton drill


This peacock green cotton sateen (mmm sateen)


This interesting Japanese tana lawn

It seems I have a thing for cotton these days. But it makes sense as we head into a Queensland summer it's better to have clothes that breathe. I also bought black overlocker thread to give me more options when I finish seams. I also wanted a beige coloured thread, but couldn't find anything that grabbed my fancy.


While I was there and seeing as there was a sale on anyway (*cough* excuse *cough*) I bought this giant cutting mat too. I've been having to shift fabric around on my current cutting mat when cutting fabric out with a rotary cutter and I didn't like doing it. So, this was more of a nice to have item that I've been wanting for quite some time.

I was going to buy some sewing patterns while I was there, but then I thought to myself,
"Vanessa, you need to use the patterns you have before you go spending more money on patterns that you could be spending on Fabric!"
So I didn't :)

My sister bought some top pop poplin cotton. I've never come across this before but it looked lovely. So the next time I go to Spotty I'll have to scope this out.

I'm not terribly familiar with all the types of fabrics out in the world so I think I'm going to have to take a leaf out of Miss Crayola Creepy's book and make a fabric swatch book.

I have some idea of how I want to use the fabric I bought. I always do lots of planning in my head, but rarely put it on paper and so I forget. So I'm going to do a post on my plans soon.

Until next time, hope your doing some retail therapy to feed your crafty habit.
Vanessa xoxo

Tuesday 6 November 2012

::Ponderings::What does creating give you?

I was thinking about it this morning on my way to the train station.
Creating something with my hands is an activity I enjoy because, for me, it's a form of meditation.
When I'm creating I am completely focused on what I'm doing. I forget about everything else, literally, and just enjoy doing something I love.
I'm taking it one step at a time and I am all about the here and right now.

A swatch I made for an online short rows course
Knitting is a good example. You can only knit an item one stitch at a time, one row at a time, one piece at a time.
At the moment I do smaller, simple and quick projects. I'm all about the instant gratification of quick results, but I think I need to get a bit more ambitious and start tackling larger more complex projects that require a bit more brain power.

What does creating give you?

Until next time, I hope your loving every moment of creating.
Vanessa xo

Thursday 25 October 2012

::Book Nook:: Gertie's New Book for Better Sewing

I've been reading Gretchen's blog Gertie's Blog for Better Sewing for awhile now and I still really enjoy it. It's a wealth of sewing knowledge and tutorials and is one of those blogs I have to read when there is a new post. I was pretty excited that she was going to have a book published, but I wasn't moved to order it on pre-sale. I'm a believer in instant gratification when it comes to buying books (well as instant as it gets when you order online and it takes a week for the book to get shipped to me :) ) I'm just no good at the looong wait.

As I mentioned when I first posted about this book I was drawn in by the posts other seamstresses where writing about the book. I saw all the rave reviews from other sewing bloggers. I. JUST. HAD. TO. HAVE. IT!!! I jumped online and did a bit of price comparison (Book Depository usually beats everyone else by the time you add in other online book stores shipping fees)


Gretchen's introduction really set the scene for the book and the design really tied in nicely with the whole 'sewing retro' theme of the book. I enjoyed how the book progressed through the various chapters in part 1, touching on the areas of sewing techniques; stabilising and tailoring; patternmaking; and fitting.

This was a fantastic lead in to Part 2: Wardrobe and wowzers what a great wardrobe it is! The pictures of construction steps accompanying the instructions for each of the patterns are a fantastic aid in visualising how each garment is put together. However I do wish there were a few more pictures with the instructions for some of the variations Gretchen has included in the book.

I found that I read the book fairly quickly, but I must admit I skipped over the instructions for the Suit Jacket and the Coat Dress at the end. I'm not really up to constructing a super tailored garment just yet.

Things I didn't like about the book:
  • The pattern envelope at the front. Not really related to the content I know, but it was a little annoying when reading the book. I think I'd prefer it at the back. My pattern envelope has come unstuck from the front cover :( - Oh well I'll just have to stick back on.
Pattern Envelope
  • There aren't enough pictures in some of the sections. I think that more pictures in the tailoring and fitting sections would be beneficial, however I should be able to find out more from fitting or tailoring reference books. I do wish that there were more pictures when it comes to the pattern variations, this is something I won't be able find anywhere else.

Things I liked about the book:
  • Fantastic patterns of course! I really like the separates and the dresses. You really can't complain about how many you get either. I mean there are 10 patterns in this book-TEN!
  • The weight of the pattern paper. It's really sturdy and looks like it would stand up to multiple tracings. 
  • I really enjoy the writing style. A reviewer on GoodReads commented that she didn't like it, however if you read the blurb on the back and the introduction Gretchen explains that this books is really an extension of her blog and therefore she has written in a similar style.
  • The book design and styling was fun and is pretty great too.
The Pattern Paper

Items I want to make (the important part : P ):
  • The Pencil Skirt; 
Would be great for work!

  • The Portrait Blouse; 
Wonderful for casual and work wear

  • and the Straight Waistline Full Skirt variation The Scalloped Waist Skirt
Would be great for social outings. Maybe work too.

  • The Shirtwaist Dress
Love, love, love - one for work and casual

  • and the Peter Pan Collar variation of the Bow-Tied Blouse.
I'll have to see if the high neckline works for me.


I'm really glad I bought this book and it is a fantastic addition to my collection.

What are you reading these days?

Until next time, I hope you're engrossed in a fantastic book
Vanessa xo

Tuesday 23 October 2012

::Show & Tell:: Fabric Purchases

I've been meaning to show you some loveliness I bought at spotlight when they had a sale a while back.
As per usual I went there to buy something completely unrelated and ended up with an armful of fabric and other bits and pieces. It was cheap and lovely and at $5 a metre I couldn't help myself.
I originally went just to buy a snap fastener kit, some thread for a quilting project I've been working on for aaages and an embroidery hoop for a project that I was meant to have completed for my 'get-together' anniversary with the Mr-that was in April :(

Anyway, anyway, anyway while I was walking around I notice that there was a sign for fabrics for just $5 a metre. I thought what the hell, I'm new to sewing and if I don't like what I make it's of no great loss. While I was rummaging through the fabrics I came across these lovelies.

Vintagey Roses
celia ptd cotton viole 112cm-2m

These colours always remind me of old style china tea sets
flower press ctn blues large blue 108cm-2m

70cms! What shall I do with it!
Passion Rayn CHLS Paisley in Latte 144cm - 70cms
This post has been in the wings for sooo long that I've already made something out of the Paisley. You can see it over here.

And as a bonus this is some fabric from the Mr's Grandmothers stash. I think it's upholstery fabric, But I totally want to make this into a lined pencil skirt.
Bonus!
What have you been stashing away? Yarn, fabric, other crafty supplies? Tell me all about it.

Until next time, I hope you're surrounded by lovely things that you have stumbled upon, or been gifted.
Vanessa xo

Thursday 18 October 2012

::Show & Tell:: IKEA Paper Holder

A couple of weeks back I went to IKEA in Logan with some mates of mine. There were a few things that I wanted, but I was also open to having a look at some other things. While I was looking around the kids' section I spotted this MALA paint/drawer storage. It made me think about this Miss P post from Portia.

Now I haven't really drafted patterns a great deal, but I thought it would be a handy and portable version of the setup that Portia wrote about in her post. And come on it's IKEA it's cheap as chips. So I went for it and scooped it into my trolled and went hunting around for paper. I went up and down the shelves looking everywhere... except what would have been right behind me when I was standing in front of the paper holding stand. Doh! So I grabbed a roll of this MALA drawing paper roll.
So I've put it all together and I've already used it! Woop! I'll show you in a coming post.

Have you recently been struck by someone else's fantastic idea and incorporated it into your life?

Until next time, hope you're being your creative best,
Vanessa xo

Tuesday 16 October 2012

::Show & Tell::Book Nook:: New Sewing Books

I'm not usually the type to shriek with excitement about getting a purchase in the mail; but when I received a couple of books I'd ordered online in the mail I did. :)

I had downloaded the Kindle Sample of The Complete Photo Guide to Perfect Fitting earlier this year and I decided that it would be a really great resource. I didn't want to order it there and then because I often find I buy things on a whim and never use them. So my trick is to put off buying something and if I keep thinking about it I must really want it. :)


After reading the reviews on the blogasphere about  Gertie's New Book for Better Sewing I had to have it! I thought I may as well buy it and The Complete Photo Guide to Perfect Fitting at the same time seeing as the it was still on my mind.


I ordered them from Book Depository on  September 8th and they arrived at my office on the September 15th. Pretty good shipping time frame if you ask me; especially seeing as shipping is free. I would usually wait until I got home to open the packages, But I was so excited I ripped them open there and then.

I've had the books for a month now (wow time flies!). I've only just finished Gertie's New Book for Better Sewing so I'll post shortly on my thoughts on the book. I'm still making my way through The Complete Photo Guide to Perfect Fitting and I'm finding it really interesting and I think it will be really helpful in future too.

If you want to have a look at what I'm reading I can be found here on Goodreads. I've found Goodreads to be a really great way of tracking what I've read and what I want to read.

How do you keep track of your books?

Until next time, hope you are a reading a great book at the moment,
Vanessa xo

Wednesday 26 September 2012

::Show and Tell:: Catch-up Time!

Hello there!

Where have you been? Oh wait! It's not you it's me that's been away for aaages. Well, I've been a bit busy DIY-ing, going on holiday and other such nonsensical things. Here's a quick run-down :)

Moving House
We moved into our house and instantly had to fix a blocked sink drain and leaky toilet. Grrr. Note to home buyers out there. If you're buying a house that is 10 years old or more, check things like drains, taps and toilets. There's other stuff too, but when you get a building and pest done, they don't usually check these things unless you especially request a plumber to come out and inspect too.

Holiday Pale Blue Cotton Seersucker shorts
I went on holiday to Vanuatu to visit my mum and dad recently and I really wanted some simple shorts for the trip.
I had some pale blue cotton seersucker and I thought it would be the ideal fabric to use for shorts. Especially if I was going to be doing some frolicking in the water. Mostly because it would dry quickly. Awesome!
I wanted to them to be super simple so I decided to make them using the pattern I'd used in the past to make the house pants I made earlier this year and my pyjama pants from the Pyjama Party Sewalong this year.


Gardening
When we came back from our trip we went to the shops and bought some seedlings. We kept them in their store pots for a week and they were starting to dry out so I transplanted them into some pots. Here they are about a fortnight ago and they've grown a whole heap since.


Sorbetto
I had planned to have made this before we went on holiday, but after having taken soooo long to complete it I'm kinda glad I didn't push myself to finish it before we left. It would have been a disaster!


Granny Square Throw
I've been working on this a little bit. A granny square throw intended for the Mr's soon to be 3year old nephew.


Craftsy Classes
I've been on a bit of a Craftsy class kick lately. I took the free short rows class and made this.

I've also signed up to "Beginner Serging" and "The Couture Dress".

And that's about it really. That brings you up to date.
Do something that makes you smile :)
Vanessa xoxo

Sunday 5 August 2012

::Crochet:: FO Brown Pippy Slippers

Heya,

This project is from before we moved, but I just had to share them with you. Aaages ago I found a really great tutorial on how to crochet some slippers by Pip Lincoln of Meet me at Mikes (it would seem according to the post that it was June last year!). I'd been meaning give this pattern a go, but never got around to doing it. However, my tootsies were getting extra chilly this year and I thought enough is enough I must make something to keep my toes toasty! These puppies took me 4 days to make. Four days! That's super quick and mega super quick for me!

You can tell how ridiculously excited I was by how quick they came together by the ridiculous number of photos I took. Here's my first slipper in progress (yes I have a grippy thing on my crochet hook like a nanna - DON'T JUDGE ME!)
Slipper one after 1 day. Booyah!
The pattern tells you to switch colours as you go, but I had a whole ball of brown Carnival Soft 8 ply that needed using (and I couldn't be bothered changing - shhh)

One completed slipper down, and one to go!
That is one cozy foot (and one cold one)
Here are both my slippers in action
I highly recommend this pattern it was easy peasy lemon squeezy! I've also Ravelled my slippers here.
Until next time, I hope you make something you'll use.
Vanessa xo

Monday 30 July 2012

::Sewing:: FO Pleated Pouches for my lady friends :)

Wowzers! It's been forever since I last posted. My excuse is that I've been off in the land of moving house. And my oh my it's a very busy place.

I haven't done a great deal of crafting lately, but last weekend I made a couple of cute pouches for a couple of my lovely friends.

My friend Jess had her birthday last week and her sister hosted a high tea for her on Sunday. My friend Sarah and I were invited and we didn't know what to get the birthday girl. On our Thursday lunch break we put our heads together and came up with the idea of getting her a bag full of movie-watching munchies and a gift card so she can buy a DVD of her choice as Jess is very much a movie buff.  Sarah was to make the bag bag out of a pillowcase. Have a look at the bag on her blog-Stitching Lyrical.

I really wanted to contribute something I'd made as well seeing as Sarah was taking some time out of her schedule to make something. So I thought I'd make Jess a little pouch to go with her bag. By chance the Mr wanted to go for a drive and I suggested we go to Spotlight. They were having a 30% off fabric sale - but I didn't mention that ;)

Jess likes elephants so when we got to Spotlight I gave the Mr instructions to keep an eye out for some elephant fabric (Sidenote: I've found the best way to keep the Mr occupied while out shopping for something he's not interested in is to give him a specific task or something to look for - but don't tell him that ;) ) He found some fantastic fabric with elephants on it and I picked this red and white one. I like the red white combo and I thought the size of the elephants would suite the pouch I was making.

While I was at Spotlight I picked up a few other things as well - naturally :) . I picked up a pack of fat quarter quilting cottons and when I was flipping through them I found this great pebbley fabric and I instantly thought it was the sort of pattern that Sarah would dig.

Once home I shoved my fabrics in the washing machine so I could press it and use it in the coming days.

To make the pouches I used a Pleated Pouch Tutorial by Skip to my Lou which I found via this great Gathered Clutch Tutorial (I think I'll have to make this soon!).

The Pleated  Pouches I made for my lady friends <3


I thought if I was going to make one pouch I may as well make two so I made the elephant one for Jess and the pebbly one for Sarah. They both turned out pretty great, even if I do say so myself. The only hiccup that I came across was my zippers where either too long or a little too short so I just extended the too-short zippers so they would fit in the opening by adding fabric at each end. I think I found this technique on Craft Passion maybe in this tutorial.

(Sidenote: I'm a bit of a fan of Craft Passion, she does some amazing things and I love her tutorials for purses and bags and...and...and... well it's all good :) )

I'm hoping to get my creative space in order soon so I can get back into creating things again and perhaps finishing off some projects too. The Mr and I did a furniture shuffle in my craft room last night so I'm one step closer to creating order in the chaos.

Until next time, I hope you make something lovely to give to someone special to you,
Vanessa xo

Sunday 8 July 2012

::Online Swaps:: Pin Cushion Swap 2012

I signed up to participate in House of Pinheiro and Sew Far Sew Goods Pin Cushion Swap for 2012. This is the first swap that I've ever participated in. So it is pretty super exciting for me :)

I was matched up with Sulieen, a lovely lady in Florida, USA. Sulieen told me that she liked blues and pinks so I had a rummage through my stash and found a few fabric options.

I used this Offset Square Pincushion tutorial from Planet June to make my pin cushion part. However, I combined it with the concept of having an adjustable strap inspired by the wrist pincushions Sunni used to sell in her shop. (see the D ring here?).


I liked the idea of the D-ring and velcro adjustable wrist strap, but the problem with making something for someone that you have never met is that I wouldn't know where would be the best place to put the velcro.  I had a brain fart and though - of course 2 D-Rings! Just like they use on motorbike helmets. So I had to make a change to the pincushion.

I'll publish a post of how I put the pincushion together another day. But here are a couple of pictures.

Here are a couple of close-ups the pin cushion top and the strap setup
With my pincushion I sent a box of snack Tim Tam. Tim Tams are famously used by Australians for Tim Tam Slams. Sooo yum! And I also sent her a mug rug so she can place her mug there between Tim Tam Slams :)


On the 20th of June I had a day of training at work, but when I ducked back to my desk during lunch a saw a package there. Upon closer inspection I saw it was from the US. Eeek. How exciting. I decided to open it when I got home so I had something to look forward to. After a very long woeful day I got home and this is some the amazingness that I found inside...
An awesome crocheted owl 
pincushion - with pins too!
Sulieen mentioned in the lead-up to the swap that she was keen on crochet so I'm really glad she was able to incorporate it into her pincushion.

All the amazing goodies I got in my package!

And here is everything that was packed into the package Sulieen sent me. WOWZER!!! She asked me if I liked a particular candy; I said that I liked Reese's Peanut Butter Cups and boy o boy did she deliver-she sent me 3 types! I also received a card, a mug, 2 really cute crocheted doilies, 2 bundles of ribbon, a postcard from Miami and a length of stretch fabric.

So I totally got the better end of the stick in this swap and I feel a bit guilty that I didn't send her stuff that was as awesome. So I'm going to have to make it up to Sulieen (and her kiddlings) with some other goodies.
That's the story of how I participated in the Pin Cushion Swap of 2012.

I hope you have been doing something new and exciting lately,
Vanessa xo